Adding Smart Text
To add a smart text entry, follow the steps below.
Step 1: Code and Title
- From the Smart Text Editor home page, click EDIT SMART TEXTS. The Smart Texts page is shown.
- Click
 . The Edit Smart Text details page is shown.
 -
In the Code box, type a unique code that will identify the smart text.
Note: If agents know this code (or at least the start of it), they can type this into the text box in Syntelate XA to quickly insert the smart text (without having to use the Smart text menu). As such, we recommend that you think carefully about the codes that you use.
-
In the Title box, type the title for the smart text.
- To activate the smart text now, click Yes under Active.
Step 2: Text
Use the Text box to enter the smart text itself. The Preview field shows how the smart text will look to an agent.
As well as freely typing into this box, you can insert database fields, URLs, and radio buttons.
Inserting a Database Field
To insert a database field, follow these steps:
- In the Insert Campaign fields section, select your universe in the Campaign dropdown. The External tables dropdown and fields are shown.
- In the External tables dropdown, select the database table containing the field that you want to insert. The list of fields updates to the fields of that table.
-
Double-click the field that you want to insert.
EXAMPLE
Jack wants to add smart text for Is there anything else that I can help you with today, <customer first name>?
To insert the customer’s first name into the smart text, Jack selects his universe in the Campaign dropdown. In the External tables dropdown, he then selects his customer details table. Finally he double-clicks the first name field.
Inserting a URL
To insert a URL (web address), follow these steps:
- In the Insert Special Characters section, type the URL into the URL box.
- Click .
Inserting Radio Buttons
To insert radio buttons into your smart text, follow these steps:
- In the Insert Special Characters section, type a radio button label into the Radio Button Option box.
- Click .
-
Repeat steps 1–2 for any other radio buttons that you want to add.
EXAMPLE
Jack wants to add the following smart text:
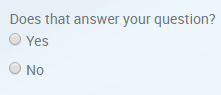
To get the radio buttons, Jack uses the Radio Button Option box. First he types Yes and then No.
Step 3: Categories and Groups
If you’ve already added smart text categories and/or groups, you can now assign your smart text to these. Smart text must be assigned to at least one category and one group to be available for use by agents.
To assign your smart text to a category, under Available Categories, double-click a category. The category is removed from the Available Categories list and added to the Selected Categories list.
Tip: To filter the available categories, type part of the category title into the Filter box.
To allocate the smart text to all (filtered) available categories, click ALLOCATE ALL.
Note: To remove a category again, double-click it in the Selected Categories section.
To filter the selected categories, type part of the category title into the Filter box.
To remove the smart text from all (filtered) selected categories, click REMOVE ALL.
To change the order in which smart text entries are listed to agents within a category, edit the category. For more information, see Adding a Smart Text Category.
To assign your smart text to a group, use the Available Groups and Selected Groups lists. These work in the same way as the Available Categories / Selected Categories lists.
Once you’re happy with how you’ve configured your smart text, click  to save.