Adding a Smart Text Category
To add a smart text category, follow these steps:
- From the Smart Text Editor home page, click EDIT CATEGORIES. The Smart Text Categories page is shown.
- Click
 . The Edit Smart Text Category details page is shown.
 - In the Code box, type a unique code that will identify the smart text category.
- In the Title box, type the title for the smart text category. This is shown to agents in the Smart text menu of Syntelate XA.
-
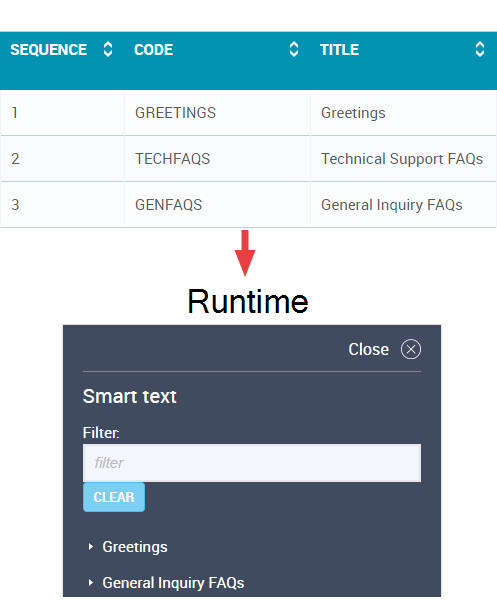
In the Sequence box, type the sequence number of the category. For example, if you want your category to be the second category in the Smart text menu of Syntelate Agent, type 2.
Tip: You can also click
 or
or  to change the sequence number. Alternatively, you can edit the sequence from the Smart Text Categories page, where you can see the full list of categories.
Note: If you enter a sequence number that is already used by another category, Syntelate Studio will automatically change the sequence number of the other category as well as that of any other affected categories.
Categories only show to agents in the Smart text menu of Syntelate XA if a smart text entry that has been assigned to that category has also been assigned to the group. For this reason, a category with a sequence number of 3, for example, could actually be listed to agents as the second category.
-
To assign smart text to your category, under Available Smart Texts, double-click a smart text title. The smart text is removed from the Available Smart Texts list and added to the Allocated Smart Texts list.
Tip: To see the smart text itself, hover over the smart text title.
To filter the smart text entries, type part of the smart text title into the Filter box.
To allocate all (filtered) smart text entries to your category, click ALLOCATE ALL.
Note: To remove a smart text entry again, double-click it in the Allocated Smart Texts section.
To filter the assigned smart text, type part of the smart text title into the Filter box.
To remove all (filtered) smart text from your group, click REMOVE ALL.
-
You can control the order in which smart text entries are shown to agents in the Smart text menu of Syntelate Agent. In the Allocated Smart Texts list, click
 or
or  beside a smart text title to move that smart text entry up or down the list.
Note: Smart text entries are only shown in the Smart text menu of Syntelate Agent if they are assigned to the smart text group that is used by the chat topic.
- Click
 .
.

