Managing Overrides
The weekly pattern defines the interval configuration for a typical week. You can, however, override specific intervals a time slot to which agents can assign tasks on specific days.
EXAMPLE
Inisoft Travel will run a special sales offer on 23 November. Based on previous experience, they know that this will result in a big increase in customer calls.
Jack at Inisoft Travel wants to ensure that, on that day, agents will be able to focus on inbound calls; they should not have a large number of callbacks to work through. Jack overrides the intervals for 23 November to significantly reduce the number of tasks a piece of work to be completed at a particular time, for example a callback or a customer appointment that can be booked on that day.
As well as overriding existing intervals, you can override an empty slot to create an interval.
EXAMPLE
Inisoft Travel’s call center is open:
- Monday–Friday 8:00 AM to 8:00 PM
- Saturday 9:00 AM to 5:00 PM
- Sunday closed
At busy periods, the Saturday opening hours are sometimes extended to 8:00 PM. On days that the call center is open later, Jack wants agents to be able to book tasks up to 8:00 PM. As such, he overrides the empty slots between 5:00 PM and 8:00 PM on the affected Saturdays.
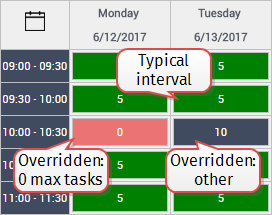
Interval Colors
In the Intervals section of the <Interval Group Description> page, the following colors are used for intervals:
- Green: A typical interval (its settings are those defined in the weekly pattern)
- Pink: An interval that has been overridden to have 0 max tasks
- Dark blue: An interval or empty slot that:
- Has been overridden
- Has a number of max tasks other than 0
![]() indicates an empty slot, as defined by the weekly pattern or a holiday.
indicates an empty slot, as defined by the weekly pattern or a holiday.
Overriding an Interval
To override an interval (or empty slot), follow these steps:
- From the Interval Manager Home page, click
 for the interval group that you wish to edit. The <Interval Group Description> page is shown.
 -
In the Intervals section, click the interval or empty slot that you want to override. For an existing interval, the interval’s details are shown in the Interval details section, including whether any tasks have already been assigned to that interval. For an empty slot, the Add Interval Override page is shown.
Tip: You can click NEXT WEEK to move forward one week. To find a specific date, click
 to open a calendar, from which you can select a date.
 - For an existing interval, click EDIT in the Interval details section. The Add Interval Override page is shown.
- Edit (or complete) the fields of the Add Interval Override page.
-
Click
 .
.Note: If you’re reducing the interval’s maximum number of tasks below the number of tasks that have already been assigned to the interval, a dialog box appears informing you of this. Click SAVE to proceed.
The tasks that have already been assigned to the interval are not canceled.
Restoring the Pattern / Deleting an Override
To restore an overridden interval to its default pattern, or to delete an overridden empty slot, follow these steps:
- From the Interval Manager Home page, click for the interval group that you wish to edit. The <Interval Group Description> page is shown.
-
In the Intervals section, click the overridden interval that you want to restore/delete. The interval’s details are shown in the Interval details section.
Tip: You can click NEXT WEEK to move forward one week. To find a specific date, click
to open a calendar, from which you can select a date. - In the Interval details section, click:
- RESTORE PATTERN (for an overridden interval)
- DELETE (for an overridden empty slot)
A dialog box appears, asking you to confirm the restore/deletion.
- Click RESTORE PATTERN / DELETE.
Tip: You can also restore/delete an override from the Edit Interval Override page.