Agents
From the Agents configuration pane you can add or edit the details of each agent. In addition, you can view and manage the agent groups they belong to.
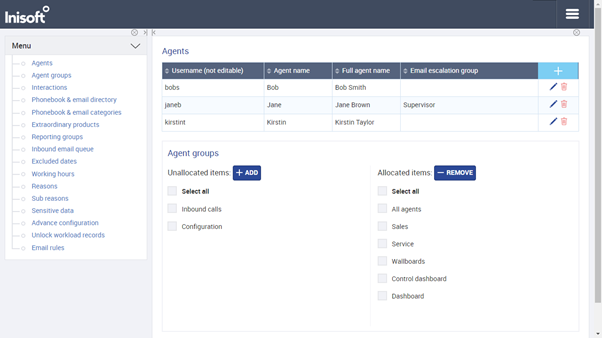
Use the Agents grid to add new agents or edit individual agent details.
Underneath that grid, you see the Agent groups allocation lists. Use it when you need to assign multiple groups to one agent, or see which groups an individual agent belongs to.
Note: If you want to add or manage the details of an agent group, or quickly see all the agents who belong to one group, use the Agent Groups pane instead.
Adding an Agent
- Click the Add button
 .
. - In the newly generated row, type the agent's Windows username in the Username field.

- In the Agent name field, type the name of the agent as it should appear to customers (in web chats, for example).
- In the Full agent name, type the full name of the agent.
- If you want the agent's emails to be routed to a supervisor for approval before sending, select an agent group of supervisors in the Email escalation group dropdown.
- Click Save
 .
.
Note:
In the Username column header, “(not editable)” means that the username cannot be changed after it’s set.
Editing an Agent
To edit the details of an existing agent, follow these steps:
- Click on the pen icon
 for the agent that you want to edit.
 - Edit the agent’s details. (You cannot change the Username.)
- Click the check icon
 to save your changes.
Deleting an Agent
To delete an agent, follow these steps:
- Click the trashcan icon
 for the agent that you want to delete.
 - Click OK to confirm the deletion.
Allocating Agents to Agent Groups
From the Agents configuration interface, you can allocate individual agents to one or more agent groups.
To allocate an agent to one or more agent groups, follow these steps:
- Click on an agent in the grid to select that agent. This updates the Agent groups section underneath the grid, which shows:
- Allocated items: The agent groups that the agent belongs to.
- Unallocated items: The groups that the agent does not belong to.
- Under Unallocated items, select the checkboxes for the agent groups that you want to add the agent to, and then click the Add button
 .
.